Showing posts with label Eating well. Show all posts

19 January 2021

Shoofly Pie

Slice of Shoofly pie.


So, a recent Zoom meeting of friends tangented (is that a word?) into a discussion of Shoofly Pie, a staple of American country cooking, particularly among Amish and Mennonite farm families.

A little googling led to this recipe in the New York Times.  Another recipe, from the Wikipedia entry for Shoofly Pie, can be found here: https://www.ourheritageofhealth.com/traditional-shoo-fly-pie-recipe/

I always peruse the reader notes in every NYT recipe; these notes are often quite helpful and one note mentioned the molasses product shown below. 


https://www.goldenbarrel.com/product/golden-barrel-supreme-baking-molasses/

So, here is my process for baking Shoofly Pie - the directions are an amalgamation of the two recipes referenced above.

1) First, defrost one 9" frozen pie shell. While it's defrosting, make the crumb mixture: Mix 1 1/2 cups flour, 1/2 cup brown sugar, 1 teaspoon cinnamon, 1/2 teaspoon nutmeg and 1/8 teaspoon salt.

2) Cube 1 stick cold unsalted butter and cut into flour mixture, using a pastry cutter, until mixture forms fine clumps.

3) At this point preheat the oven to 425 degrees.

Have the defrosted pie crust and crumb mixture ready to hand. Put your pie crust on a baking sheet. UNDER NO CIRCUMSTANCES should you try to maneuver this liquid-y pie onto an oven rack. It will spill and slosh and there will be burnt molasses all over the bottom of the oven.

4) Now, here's where my directions are a bit different. I put half the crumb mixture into the pie shell. (Sorry no image - soon.)  Then I measured 3/4 cup of baking molasses (see above) in a 2-cup liquid measuring cup. Using another measuring cup, I poured 3/4 boiling water into the molasses. Then I added 1/2 teaspoon baking soda. I stirred this well, it started to foam, and I immediately poured the molasses mixture onto the crumbs in the pie crust. 
 
5) Finally, I mounded up the remaining crumbs over the top of the pie.

Filled pie, ready to bake.


6) I put the pie, on its baking sheet, into the oven and set the timer for 15 minutes. After 15 minutes, the oven temp was lowered to 350 degrees. I gave the pie another 35 minutes; 30 would probably have been enough.


Puffed up while in the oven.


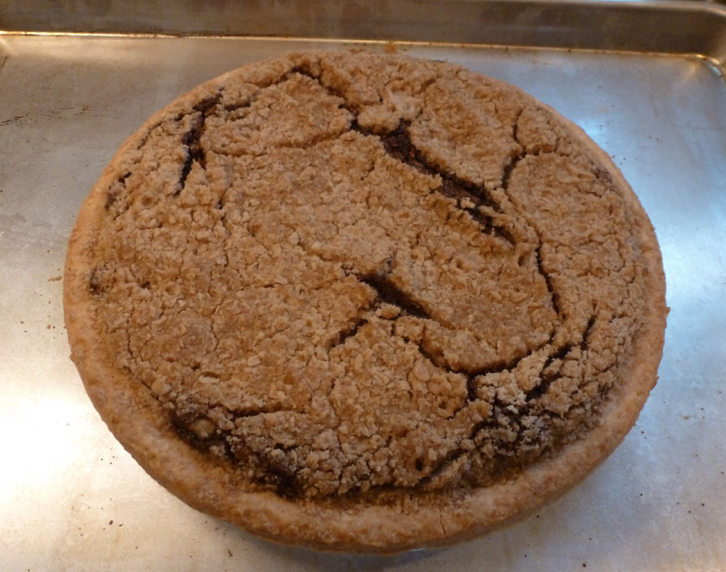
All baked - crumb crust nicely browned.


7) When removed from the oven, the pie rested on a rack until cool, and then was popped into the fridge.  

My husband then cut the pie and, much to my surprise and relief, the pie held its shape nicely.   Thank you, St. Honore, patron saint of bakers.  We let our slices come to room temperature before enjoying, washed down with some decaf.


One quarter wedge removed, then sliced into 2 pieces.


The pie forms three layers - a molasses layer just above the crust, a kind of cakey layer of molasses-soaked filling in the middle, and then the slightly crunchy crumb layer on top. Surprisingly good.

16 December 2020

Gingerbread people stay safe

A cookie for our times.
  

Made by a wonderful local caterer surviving by offering take-out meals and treats.

02 April 2020

From the pantry - Hummus with canned beets

Beet hummus on crackers - yum!

So, it may be difficult to find toilet paper and diapers, but there are plenty of canned beets.  Not to mention tahini, which we often find near the peanut butter in our local grocery store, as they don't really know where to put this slightly exotic, and delicious, substance made of ground sesame seeds.

Any kind of tahini will do.


Beet Hummus

1  14-ounce can sliced beets, drained
¼ cup olive oil
Juice of 1 lemon
3 cloves garlic
½ cup tahini
1 teaspoon cumin
Salt and pepper, to taste

Combine all ingredients in a food processor or blender.  Blend until smooth, adding a bit more oil if necessary. Serve with pita bread, pita chips, crackers, or veggies.

Optional
Add one 14-ounce can drained and rinsed chickpeas.


Thank you for reading my blog. It means a lot to me, especially during these challenging times.


14 October 2018

Rite of autumn - homemade applesauce

Color on the Charles River.

A seasonal tradition in our home is venturing out to a local farm and picking apples. Or just buying a peck from our farmer's market here in Newton.  Then DH makes applesauce using three ingredients: apples, water and his secret weapon, Calvados, apple brandy from Normandy. Here follows a boringly detailed method for home-made applesauce.

A peck of apples, large pot and food mill.

The equipment - large pot, and a food mill (we use one by Oxo). The ingredients - the aforementioned Calvados, and about fifteen apples (we like Macoun).

Scrubbed apples.

You do not need to peel the apples, but wash them well. We use "low-spray" apples, which means the farmer uses fewer chemicals.  Cut each apple in half and remove the core and seeds, and any stem fragments.  Place apple halves into large pot (DH uses an 8-quart pot.) Add a scant cup of water and bring the pot to a boil. Turn the heat down to medium-low, and simmer, covered, for about one hour.  The apples release plenty of liquid as they cook.  Stir occasionally.

Apples being prepped.

Pot full of apples.

Cooking down.

After an hour, almost all of the apples chunks should be soft; it's time to add about 1/2 cup of Calvados. Cook, on low heat, for another 30 minutes, or until all the apples are mushy.  The fragrance of the apples and brandy will delightfully perfume your home.

Good quality apple brandy.

Cooked apples, ready for the food mill.

Then set up your food mill over a large bowl, using a medium grinding disc. It's hard to believe, but my grandmother had to make all her own baby food using a food mill back in the 1920's, before the Gerber baby food company began industrial production in 1927.

Use the medium grinding disc.

Load the cooked apples, peels and all, into the food mill and turn the handle to push the apples through the disc. Every now and then reverse direction to dislodge peel residue. By the way, children love to turn the food mill handle.  As the cooked apples are processed, simply add transfer more apples from the pot to the food mill.

Cooked apples loaded into food mill.

The chef at work.

Silky applesauce emerges from the mill.

Almost done.

Peel residue in mill.

Remember to get every bit of apple-y goodness by scrapping the bottom of the mill.

Yum! We will freeze some for mid-winter.

A bowl with just a touch of cinnamon. A taste of autumn in New England.

01 April 2013

April Fool's Cookies


Cookies with flecks of thyme and lemon zest.

Wait a minute - thyme, black pepper and olive oil in a cookie? Yes, and it's not an April Fool's joke, just a yummy treat.

Lemon Thyme Olive Oil Cookies

2 cups all-purpose flour
1 cup sugar
½ tsp baking soda
½ teaspoon freshly ground black pepper
1 tablespoon chopped fresh thyme leaves [I just strip them off the stems and use whole leaves]
½ cup extra virgin olive oil
3 tablespoons milk
1 large lemon, zested and juiced

Preheat the oven to 350 degrees. Line 2 baking sheets with parchment paper or silicone baking sheets.

Put the flour, sugar, baking soda, pepper, and thyme into a bowl and mix together to combine. In a small bowl, mix together the olive oil, milk, lemon juice, and lemon zest.  Add the liquid ingredients to the dry ingredients, stirring with a wooden spoon until you form a nice smooth dough. [Note: I throw everything into the electric mixer with regular attachment.]

Roll heaping teaspoons of the dough into balls. Place them about 2 inches apart on the prepared baking sheets. Bake the cookies about 12 to 15 minutes, or until they are browned around the edges. [I find they need the full 15 minutes.]

Let the cookies cool for a few minutes on the baking sheets and then transfer to wire racks to cool completely.

Makes about 36 cookies

Source: George Duran on foodnetwork.com

30 November 2012

Cold Weather Root Vegetable Stew

Turnips, parsnips, carrots, butternut squash, sweet potatoes.


We've had a cold snap here in New England, so it's time for a warming trend in the kitchen.

Root vegetable Stew
Serves 8

1 medium (2-3 lbs) butternut squash, peeled
1 medium celeriac (celery root), peeled
4 medium turnips, peeled
2 sweet potatoes, peeled
5 medium parsnips, peeled and chopped
5 medium carrots, peeled and chopped
4 medium onions, chopped
3 Tbs olive oil
1 28-oz can diced tomatoes
2 sprigs fresh sage (1Tb dried)
2 sprigs fresh thyme (1Tb dried)
6 cups chicken or vegetable broth
3 large garlic cloves, chopped
salt and pepper to taste

Cut the butternut squash into  ¾” pieces.  Cut the turnips into ½” pieces.  Peel and cut the celeriac into ½” pieces. Peel and cut the sweet potatoes into ¾” pieces.  Directions to cut different vegetables into different sizes may seem fussy, but butternut squash and sweet potatoes cook more quickly than the other vegetables, so need to be in larger pieces to avoid turning into mush.

In a large pot, heat the oil and cook the onions over medium heat, stirring often, for 10 minutes or until they soften. Stir in the garlic and cook for 1 minute.

Add the canned tomatoes, juice and all, and stir in the butternut squash, turnips, celeriac, sweet potatoes, carrots, parsnips, sage, thyme, salt and pepper.

Pour in the broth.  Add sufficient water to cover the vegetables, if necessary.  Bring to a boil, lower the heat, set the cover on slightly askew and simmer the vegetables gently, stirring occasionally, for 45 minutes or until they are tender.

Taste for seasoning and add more salt and pepper if necessary. Remove the sage and thyme if using fresh. Ladle the stew into large bowls and serve with crusty bread.

Note: we sometimes add two turkey sausages, sliced and browned, in with the veggies. Use sweet sausage or hot, or a combination. 

Adapted from a recipe by Lisa Zwirn, The Boston Globe.


12 September 2012

Fresh Corn Salad


Since making textile art is hard work, we need to refuel and take care of ourselves. It's sweet corn season here in New England; here's an "off-the-cob" recipe we enjoy.

Chunks of corn kernels are main feature of the salad.
 
Fresh Corn Salad

Dressing
½ cup cider vinegar
¼ cup sugar
½ tsp salt
few grindings black pepper

Salad
4 ears fresh corn, briefly boiled
½ cup finely diced red onion
½ small cucumber, seeded and chopped
½ cup red or orange sweet pepper, finely chopped
12 cherry or pear tomatoes, halved
3 Tbsp (about 6-8 large leaves) basil, torn
3 Tbsp parsley, torn (optional)
1 Tbsp fresh jalapeno pepper, seeds and veins removed, finely diced 
     (can use canned jalapenos in a pinch)
1 to 2 cups arugula leaves, stems removed

1. For dressing, in glass or stainless bowl, mix together vinegar, sugar, salt and black pepper until sugar is dissolved. Allow dressing to stand while preparing salad.

2. For salad, cut corn kernels from cobs. In large bowl toss corn and remaining ingredients except arugula.

3. At serving, divide arugula among serving plates or bowls. Pour dressing over ingredients in large bowl, mix gently and place over arugula.

Makes 6-8 servings as a side salad. Adapted from Better Homes and Gardens magazine, July 2012

Notes on preparation:

When cooking corn to cut off the cob, break cobs in half - the halves fit better in the pot and are easier to handle when cutting off the kernels. Boil only for a few minutes.

Half cobs fit nicely in pot.

Stand half cob on end, slice off kernels with sharp knife.
After arugula is washed, I just slice off the stems - yes, it's a bit nicer to tear off stems individually, but that's time-consuming.

Trimming arugula.

Trimmed arugula awaits the topping of dressed corn mixture.

Finally, I think this salad would be almost as good with frozen corn, prepared as per package directions, and will try that this winter, when the ears of sweet corn at the farmer's market are a memory.