30 October 2020

Maine Mineral and Gem Museum

DH holds a piece of moon rock.


We recently took our first long-distance field trip in months. Two lures - Maine rescinded travel restriction on visitors from our state, and we read about the Maine Mineral and Gem Museum.  After visiting friends in Portland, on their outdoor terrace, we continued on to Bethel, Maine. 

The museum is right on the main street, and has a rock garden - emphasis on rocks - skirting the building.  This the 200th anniversary of Maine's statehood and  Maine's state gem is the tourmaline. Sadly, the planned celebrations of both Maine and the tourmaline had to be post-poned.  At the time of this writing, the museum has had to shutter its doors again due to a water leak.


Banners give a hint of the goodies inside.


One thing we like very much is that this isn't just a display of interesting objects - the museum makes a real effort to tell the stories of the people behind the work of prospecting for minerals such as feldspar, used in the production of porcelain, and for gemstones.  One long-time "rock whisperer" is Frank Perham, a senior statesman among Maine geologists and miners.  The museum founders, Mary McFadden and Lawrence Stifler, acquired much of the core collection from Mr. Perham, whose father Stanley and mother Hazel managed a mineral and gem retail store for many years.  Many of the historic finds in Maine have been acquired by Harvard and the American Natural History Museum, so it is particularly pleasing that many items will remain in the state in which they were  discovered.


Monocline feldspar and paver dedicated to Frank and Mary Perham.

Large samples of Maine's minerals and ores in the rock garden.


Note the crystal motifs of the window grilles.


We had the museum pretty much to ourselves when we visited; the masked volunteers were helpful and enthusiastic, but not intrusive.  One highlight is the opportunity to hold a piece of the moon (see first image above). Not a lunar rock retrieved by astronauts, but a chunk ejected from the moon which fell to earth as a meteorite. Very cool. We'll be returning.

29 October 2020

Farewell, Lord & Taylor


Iconic script logo.


After almost two centuries in the retail firmament, Lord & Taylor filed for bankruptcy late this summer.  Although insignificant compared to the loss of human life this year, the demise of this store is a passing of a kind, and I am in mourning.

I especially will miss Lord & Taylor's own brand and the petite range.  Petite sizing was championed by Dorothy Shaver, who became the first woman to head a major retail corporation when elected president of Lord & Taylor in 1945, a position she held until her death in 1959. According to her obituary in the New York Times (29 June 1959):

In 1932 she [Ms. Shaver] challenged Parisian domination of fashion by encouraging and developing native American designing talent. During the next eight years she promoted and publicized the clothes and names of sixty young American designers who had previously worked anonymously.
Ms. Shaver also helped establish the Costume Institute at the Metropolitan Museum of Art, among many other accomplishments.

Going out of business sale.


Noted for dresses.


Store fixtures.


Red and black banners signal the end.


The jewelry counter, deserted.


I visited the Lord & Taylor store at the Natick Mall, to say goodbye, and perhaps make one last purchase. I ended up ordering something from the Lord & Taylor website. Ironic, as a company called the Saadia Group just purchased Lord & Taylor for online business only.  It won't be the same.

30 September 2020

Boo! - Little Ghosts by Yarn Birdy

 
Three ghosts, and a pumpkin, ready for Halloween.

Went prowling recently for Halloween-themed knitting projects. Found this too cute pattern on Alexis Hamann-Nazaroff's Ravelry page: https://www.ravelry.com/patterns/sources/yarn-birdy/patterns
Ms. Hamman-Nazaroff offers lots of sweet small knitted toys and decorative items.
 
Little Ghosts
The little ghost is knit in the round, in one piece, from bottom to top.
 
Materials
Worsted weight yarn in white, scrap lengths
    I used Plymouth "Galway", color #8
Four US size 3 double-pointed needles (3.25 mm)
Embroidery thread, black
    I used DMC floss, color #310
Tapestry needle
 
Abbreviations
CO =  cast on
    I found the long-tail cast-on gave a slightly nicer edge for this project.
DPN = double-pointed needles
k = knit
k2tog = knit 2 stitches together into 1 stitch
ssk = slip, slip, knit: slip the next 2 stitches onto the right-hand needle knitwise, stick the tip of your left-hand needle into them from above, and knit them together into 1 stitch.
    I found this tutorial very helpful: https://newstitchaday.com/ssk-slip-slip-knit-decrease-knitting/
yo = yarn over. Wrap the yarn around the needle to create an extra stitch. 
 
Pattern
Cast on 33 stitches and divide evenly over 3 DPNs (11 stitches per needle)
 
Round 1 (and all odd rounds through round 9): k
Round 2: [k2tog, k3, yo, k4, ssk] 3 times (30 stitches)
Round 4: [k2tog, k3, yo, k3, ssk] 3 times (27 stitches)
Round 6: [k2tog, k2, yo, k3, ssk] 3 times (24 stitches)
Round 8: [k2tog, k2, yo, k2, ssk] 3 times (21 stitches)
Round 10: [k2tog, k1, yo, k2, ssk] 3 times  (18 stitches) 

Round 11 - 18: k

Round 19: [k2tog, k1] 6 times (12 stitches)
Round 20: [k2tog] 6 times (6 stitches)
Round 21: Cut the yarn, leaving a tail about 8 inches long, and thread this through the remaining stitches. Tie a knot and pull the thread inside the ghost out of sight.
    I tied a knot and also wove the end in a bit before cutting the yarn. 
 
Finishing
Add the eyes by threading all six strands of black embroidery floss onto a tapestry needle and wrapping around a knit stitch 3 or 4 times; carry floss inside to other eye and repeat. I knotted the floss and also used a bit of fabric glue on the knot for extra security, but this is probably optional.

All ready for ghostly fun.
 
Note about gauge:
Gauge really doesn't matter for this project, so you can use any needles and scrap yarn you might have. Just make sure the yarn knits up into a tight, firm fabric so that the final toy holds its shape.
So, this probably means you should select needles one or two sizes smaller than the recommended size for your yarn.

Not too scary, but fun.

14 September 2020

Simple Shawl in Hu Made Singles yarn

Long-suffering DH models knitwear.

So, I bailed from a Mystery Knit Along project when realizing after knitting the first section that the end result would require weaving in about 254 ends.  BUT I had four skeins, in four different colors, of absolutely lovely superwash merino fingering weight yarn from Hu Made.  Owner/artist Amanda Hu hand-dyes wonderful tonal shades and is a whiz with color.  The shade of my shawl is Voyager, and the yarn features a soft halo while still crisp enough to define an eyelet pattern.
Roaming around Ravelry I found a pattern for a one-skein shawl which another knitter had made up with the Hu Made Singles yarn. She kindly answered my query concerning needle size, and I was set. 
The pattern is Simple Shawl by Jane Hunter and - the icing on the cake - it's a free pattern! So I can repeat it here for you, in case you don't have a Ravelry account. Also, I'll add some notes, and measurements for American knitters, since, sadly, we still don't use the metric sytem.

Materials
Size 5 or 6 circular needle - or a needle size to give a loose, drapey body for the shawl. I used a Size 5. You can use 16" or 24" to begin with, but  eventually you will have almost 300 stitches and you'll require a 32" needle.
In addition, for the optional picot cast-off, using a one size down needle (any length) will make a neater edge. I used a size 4 for the picot cast-off.

Finished size
The triangular shawl is about 12.5" at the widest point, and about 58" long.
Abbreviations
K - Knit
KFB - knit into the front of the stitch and then the back of the same stitch
YO - yarn over
K2TOG - knit 2 stitches together
Set up 
Cast on 3 stitches.
Row 1 - KNB, K1 (this will become your 'center stitch'), KFB = 5 stitches.
Mark the center stitch now, using a removable stitch marker or by placing a stitch marker either side of the stitch and slipping the markers across on every row.
Pattern
Row 2 - KFB, knit the  center stitch, YO, K1 (the center stitch), YO, knit to the last stitch, KFB.

Row 3 - KFB, knit to the last stitch, KFB.

Row 4 - KFB, knit to the last stitch, KFB.

Now, the original pattern stated to continue knitting until 305 stitches on the needle, but my yarn was running low and I didn't feel like playing chicken with the pattern.  So, I completed the pattern when I had 293 stitches on the needles. (146 stitches on either side of the center stitch.)

Ball of Hu Made Singles, in Moonly.

For comparison, you can see in the image above, an unused ball of the Hu Made Singles next to the tiny amount of  Voyager I had left after knitting the shawl.
IMPORTANT
Because the Eyelet Section needs an even number of stitches on either side of the center stitch, end the pattern after Row 4.
Eyelet Section Pattern
Row 1 - KFB,  K1, *YO K2TOG*, repeat *-* until center stitch. YO, K1 (center stitch), *YO K2TOG* repeat *-* until last 2 stitches K1, KFB.

Rows 2 & 3 - KFB, knit all stitches until the last stitch, KFB.

Row 4 - KFB, knit to center stitch, YO, K1 (center stitch), YO knit to last stitch, KFB.

Rows 5 & 6 KFB, knit all stitches until the last stitch, KFB.

Row 7 - Repeat Row1 of the Eyelet pattern.

Rows 8 & 9 - Repeat rows 2 & 3.

Row 10 - KFB, knit to last stitch, KFB.

Picot bind-off
Of course this is optional.  Feel free to do a regular cast -off.  A Youtube video I consulted noted that the picot bind-off can be a bit "ruffly" and can flare, so I sized down one size needle for this - from the size 5 I used for the body of the shawl to a size 4.

Step 1 - Cast off 3 stitches. Slip the remaining stitch back onto the left hand needle.

Step 2 - Cast on 2 stitches. Cast off 5 stitches (pattern designer Jane noted that she always purls the first stitch of the 5 stitch cast off, so I did too.)  Slip the remaining stitch back onto the left hand needle.

Continue to repeat Step 2 until the last stitch.

Fasten off, and block (I never bother) and weave in ends.

I found this Youtube video helpful for the Picot bind-off: https://newstitchaday.com/how-to-knit-the-picot-bind-off/
Wouldn't it be fun to add beads to the picot edging?!

15 August 2020

Ruth Asawa postage stamps


Just a quick post. Postage stamps honoring sculptor Ruth Asawa (1926-2013) are now available. If you can't find them at your local post office, stamps and first day covers may be ordered here: https://store.usps.com/store/home

You have to set up an account, but it is a convenient way to purchase stamps, especially in these pandemic times.

This tribute to Ms. Asawa is long overdue; learn more about her here: https://www.nytimes.com/2020/07/20/t-magazine/ruth-asawa.html?searchResultPosition=1

14 August 2020

Eco Printing with Mary Delano


Plants arranged on a length of cotton.

On a very hot recent August day, seven women, including me, joined fiber artist Mary Delano for a full day workshop of eco printing, sponsored by the Massachusetts Horticultural Society.

What is eco printing? It's making designs on treated fabric using found plant material. The pigments found in the leaves and flowers deposit onto the fabric, resulting in one-of-a-kind creations. Results are hard to replicate, so the emphasis is on experimentation and exploration, although there are some procedures to follow.  Some well-known practitioners, in addition to our instructor, include India Flint and Jane Dunnewold.

Our hard-working instructor gave each participant eight narrow lengths of diverse fabrics - including repurposed tablecloths, raw silk, and a hemmed silk scarf - all of which she had soaked in mordant.

Flowers and leaves positioned on fabric.

End result! (detail)

First, I took the mordanted cotton fabric and wet it in plain water, wringing it out well.  For this exercise we also dipped this fabric in tannin, which acts as a modifier.  Then I placed the damp piece of fabric, treated both with mordant and tannin, on  plastic wrap. Next, geranium and Japanese maple leaves and black-eyed susan flowers were positioned onto the fabric. Finally another piece of cloth - NOT mordanted but dipped in a solution of iron (ferrous sulfate) was placed on top, forming a sort of sandwich of vegetation between two differently-treated lengths of cloth. Finally, the "sandwich" is rolled up, plastic and all, on a plastic wrap-covered wooden stick (looked like a piece of broom handle.)

NOTE: it's really important to wear gloves while working with the iron solution, as it will stain your hands. Also, never use utensils and tools used for dyeing for food preparation.  The dyes and plants are natural but the chemical mordants and modifiers can be toxic, so take precautions when working with these substances.

Leaves and flowers "sandwiched" between treated pieces of cloth.

Fabric and leaves rolled around a thick wooden stick.

The tightly rolled bundle is then tightly tied with string.  It's really important to roll and tie tightly, as the flowers and leaves need good contact with the fabric to deposit pigments.  Once we had all rolled a bundle, Mary steamed them in a lobster pot, fueld by propane and outside the studio. The bundles steam for an hour, with an old towel draped over the steaming pot to slow down evaporation.

Fabric bundles steaming away.

Using old slow cookers, Mary also had some dye pots ready for us, including dye made from purple beech leaves. I put the raw silk length into this dye bath for about 30 minutes, resulting in a muted brown. I imagine Friar Tuck, from the Robin Hood tales, wearing robes of this color.

Raw silk dyed with purple beech leaves.


I placed a number of birch leaves and hydrangea florets onto this cloth, rolled and steamed it, but the imprints were almost invisible. However, with this approach to surface design, you can try again - just take the damp fabric and put more, and different, leaves and flowers on it and re-bundle. I did this, using Japanese maple leaves and coreopsis stems and had much better results.

For another dye bath, Mary dumped goldenrod - leaves, stems, flowers and all - into another slow cooker, let it stew and voila! - a beautiful bright yellow, seen below.

I like this just as it is.

After the bundles steam for an hour or so, it's time for the Great Reveal.  Here we are, in our pandemic masks, unrolling one creation on an old towel. It was so exciting we could hardly wait for the bundles to cool off, and steam escaped as we opened the work.

Anticipation.

Removing the spent leaves.

Andrea had done this before and brought some plants from home.

Some of our materials - birch leaves and hydrangea.

Drying in the sun.

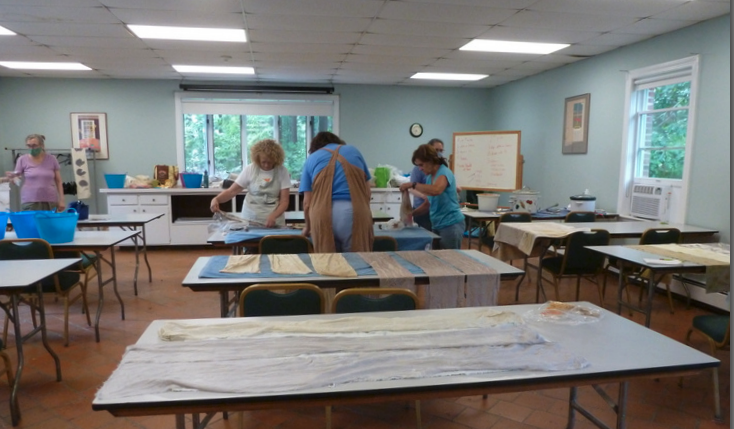
Our workspace.

Do you see the air-conditioner in the image above, in the window to the right side? This piece of HVAC equipment imitated the sound of a jet engine, so most of the time it was turned off, so we could hear Mary. The room became a bit toasty, but we must sacrifice for art.

Mary printed petals of a giant hibiscus flower.

My seven samples, at the end of the day.

Back home, I heat set my sample with a steam iron, and won't wash for 3 weeks, if indeed I wash them at all. Mary often adds embroidery to her pieces and I can see that stitching would add texture and some depth to these pieces.

Queen Anne's Lace, stems and all, on silk.

Resources and supplies, courtesy Mary Delano

woolery.com: tannin, iron, copper, alum, natural dyes
maiwa.com: tannin, natural dyes
dharmatrading.com: silk scarves and fabric
prochemicalanddye.net: alum and sodium acetate
hillcreekfiberstudio.com: iron sulfate and copper sulfate
Facebook Group: Printing with Botanicals

Some of Mary's favorite plants for printing:

Japanese maple, other maple, sumac (leaves and cones separated into little pieces), birch, oak, locust, threadleaf coreopsis (flowers and stems with leaves), rose leaves, Lady's mantle, peony leaves, lupine leaves, begonia flowers and red leaves, osteospermum (dark red flowers), perennial geranium (leaves and flowers), raspberry, blackberry, strawberry (leaves), black-eyed susan (trim cone so flower lies flat), goldenrod (flowers and stems with leaves), false indigo or baptisia (leaves), marigolds, purple smokebush (leaves and "smoke")

31 July 2020

Tammis Keefe ad in Vogue magazine


Every now and then some Keefe-related ephemera comes my way, such as this advertisement I found on ebay.  It's part of a page from Vogue magazine, 1952.  This page also featured ads for Wisconsin Cheese, "Mother 'N' Daughter" aprons, and Nefertiti Egyptian Designs, vases from Kipp Ceramics.

Several  interesting discoveries in this ad: the copy gives a name, "Hokus Pokus", to two of Keefe's designs and the image prominently displays her packaging design for the set.  Finally, the ad lists Bloomingdale's as the retailer.   The late Phoebe Ann Erb, an independent scholar who had spoken with some of Keefe's contemporaries, was told that Keefe's designs, signed as "Tammis Keefe", were exclusive to Lord & Taylor.  We now know that some designs were sold at Bloomingdale's as well.

Both of these designs are shown on our website; when my husband has time, we'll re-label them as Hokus Pokus 1 and Hokus Pokus 2.


Hokus Pokus 1, gray


Hokus Pokus 2


Hokus Pokus 1, black